Last Updated on
In order to get the best results, it makes sense to be fully aware of how to use a scroll saw correctly. That means a number of clear steps should be followed if you wish to start using a scroll saw, but the good news is you don’t need to have an extensive amount of experience in working with wood. Alternatively, if you know how to use a scroll saw, life can be made easier.
Thankfully, even a beginner should be capable of producing something that they can be proud of. But to do this, you must be aware of how to correctly set up this saw, as that plays a key role in what you can then create.
Introducing the Scroll Saw
Before we get into how to use a scroll saw correctly, we need to introduce this power tool quickly.
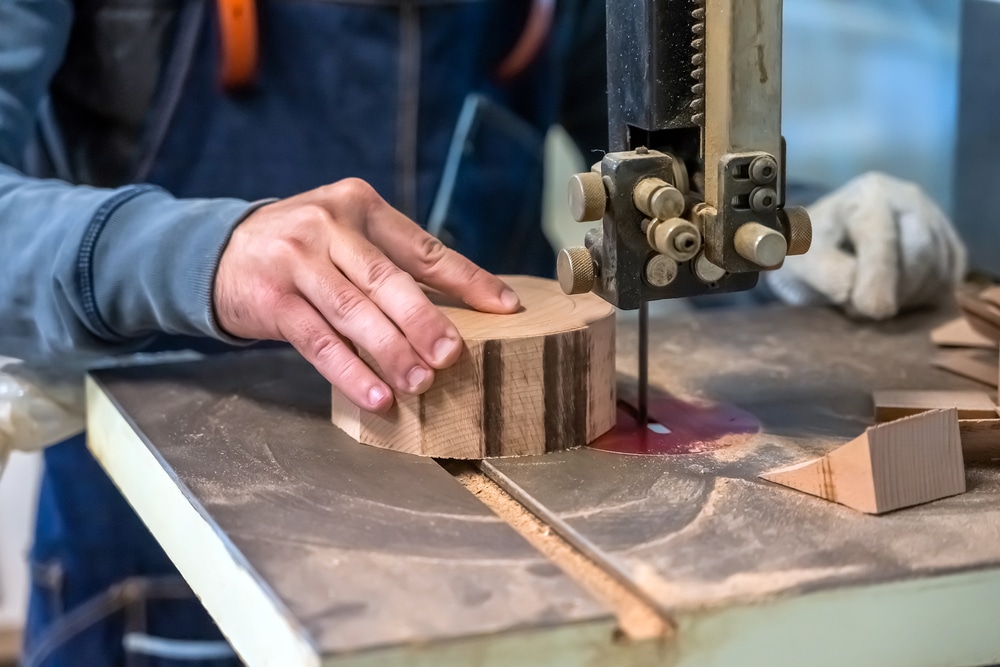
Small in size, the scroll saw will prove to be highly effective when seeking to cut rather intricate marks or curves into wood and metal. That does mean that the scroll saw has a very specific use, but the key here is the blade that tends to come with the saw.
The blades are long and thin. They work in a verticle position coming down through the wood to cut. The saw does this at speed, but one of the best things about this saw is how you can control the speed.
It is essential, thanks to the nature of the projects that people will often create with this saw. But if you want to create something that ultimately looks quite great, we’ll provide you with a number of tips and suggestions that you need to keep in mind.
Who Will Use a Scroll Saw?
A scroll saw can be used by anybody who is looking to make those smaller, intricate cuts that a regular saw is going to be unable to make. From arts and crafts up to larger projects, this saw can make a significant difference to the end result you can achieve.
If you venture online and see intricate frameworks or lattice cuts, then the chances are that a scroll saw would have been used in their production. That alone will provide you with some insight into what is possible with this saw.
The Fine Nature of the Saw Blade
One of the first things you will notice with a scroll saw is that the blade is significantly finer than most other saws. It is due to the rather delicate cut that it can produce, but don’t for a second think that this means it is inferior compared to other power tools.
Instead, a scroll saw is powerful, which is why it can cut through metal and wood.
The teeth on these blades will tend to be smaller, but they can still get through a thick wood, thanks to the power of the tool.
Humble brag: this is a huge benefit to going to a small school in WY focused on vocation. My 7th grader’s eoy project, scroll saw Greenhead pic.twitter.com/6uPBLSpm2E
— Colin beef jerky advocate 🛢🪨 (@colinmhngry) May 27, 2021
Safety First
As with any tool, safety is always key. Ensure the space you are working in has good ventilation to allow the dust to move around. Some scroll saws will have a dust blower attached, but you should still look at wearing a dust mask to make life a whole lot easier for you.
Goggles and also gloves will be another good idea. Also, make sure you have enough space to work in because even though you will often be using smaller pieces of wood, you never want to use tools in a cramped location.
Begin With a Simple Pattern
It is an important tip; if you are starting off with using scroll saw blades for the first time, then use a simple pattern.
There are different patterns and potential woodworking projects available online, so download some patterns and test things out on some spare wood you have lying around.
It will make it easier to follow the steps when using a scroll saw blade to create a more intricate project or end result.
Getting Started With Using a Scroll Saw
So, let’s get started by explaining how to use a scroll saw, as there are a few steps to work through.
Step 1: Mark Out Your Pattern
Your first step must involve you marking out the pattern you would like to cut out on the material you are cutting. It acts as your guide, and it is an essential step that you cannot afford to miss.
Step 2: Test on a Scrap Piece of Wood
It’s also essential that you test your scroll saw on a scrap piece of wood to get accustomed to how it operates. It allows you to play around with the blade tension and even the different scroll saw blades that can be put onto the machine.
Also, this is your opportunity to try out different scroll saw patterns before you go ahead and get to work on cutting the actual pieces of wood or metal you wish to work on.
Step 3: Create Positive and Negative Areas
When working on your desired design, keep in mind the need to have both positive and negative areas on the wood. It is where you will know which areas are to be cut and those to be left alone. You may also see them referred to as bridges. These are the positive parts that will connect the different parts of the scroll saw projects.
What a sweet memory. Ronnie and Sweet Ma. Yes, that is what they call her. That is cool little game table that my stepdad made. The top is a chess board. My mom made all the chess pieces with a scroll saw. pic.twitter.com/xAGgjbVmxw
— Attitude with a side of freckles (@HazeyDaisey17) June 1, 2021
Step 4: Put On Your Safety Gear
Staying safe is always important, so put on your safety goggles as an absolute minimum if pieces of wood or metal shear off. You don’t want to be having any of that landing in your eyes.
Step 5: Secure the Scroll Saw to a Surface
You want to make sure that your scroll saw is secured firmly to a surface before starting any of your projects. The machine does use power to move around if not secured, and that’s going to make things harder when you start cutting.
Exactly how it is going to be secured will depend on the model you use, so check the manual and follow the instructions before you even think about plugging in the saw.
Step 6: Understand the Right Blade
When it comes to cutting the material, you have different types of blades to choose from. We recommend starting with blades that are classed as either a size two or a size three. They can be used for most scroll sawing projects, and it’s easy to control the output as well.
It is due to the smaller the blade, the slower it will cut through the material. It is important with intricate patterns where precision is absolutely key, so controlling the speed in this way is a massive help.
Step 7: Using a Larger Blade
It should be more in a list of tips than a step, but it’s the reason why you would want to use a higher number blade with a scroll saw.
Blades with numbers such as five or seven will be better when you are cutting through thicker wood that is getting close to an inch in thickness.
Step 8: Deal With the Tension
Once you have selected the blades, you need to look at dealing with the tension part. You need to get the correct end result, no matter the type of wood or project you are working on.
To adjust the tension, you need to look at what the manufacturer has said for the scroll saw that you own. That’s because the method used for the tension will vary slightly depending on the brand.
However, there are some things that you can do, no matter the company that made the saw.
Step 9: Pressure on the Middle of the Blades
No matter the type of blade you use, you need to apply some pressure on the middle of the blade when dealing with the tension. When you do this, it will let you see if the correct amount of tension on the blade according to how much it then moves.
Blades should not move more than an absolute fraction of an inch. If they move more than this, then the tension needs to be increased. It is not only for your safety, but it also means that each tooth on the blade will not simply bounce all over and ruin the project you are working on.
This guy was a quick sketch to test out my new scroll saw! I love his derpy mouth. #neonthrash #woodcut #lowbrowart #lowbrow #monster pic.twitter.com/tqhISNRlma
— Brian Dibala (@NeonThrash) May 28, 2021
Step 10: Make Sure It’s Not Too Tight
But here’s another essential point you cannot ignore, and that’s stopping the blades from being too tight. Pluck the blade, and it should make a nice ping sound. Having a blade that is too tight will mean it can break, and that’s not something you want to happen.
Step 11: Turn on the Scroll Saw
It now means you have set up the scroll saw, and you are ready to get to work. Plug it in, turn it on, and you are ready to start.
Step 12: Turn on the Light and Dust Blower
This exact step will vary depending on the model you own, but you may have to also turn on the light source and dust blower. It will be to your advantage if your scroll saw does have both of these, as it makes it easier to follow the pattern, as wood does throw up some dust when cutting it.
Step 13: Getting Ready For Cutting Patterns
You are now ready to start with your pattern but refer back to the earlier step, whereby we recommend using a scrap piece of wood to make sure the tension and blade are the correct ones for your project.
@GroovyBruce I immortalized you by cutting this out of wood on my scroll saw. Sadly, I didn’t think to make it out of Ash. pic.twitter.com/yvNds4ho2o
— Fingers Crossed Woodworking (@LingJosh) May 31, 2021
Step 14: Set to a Slow Speed
If the wood you are working on is thin, or you are going for a more intricate pattern, then set the saw to a slow speed is essential. Also, reduce the speed if new to using this machine, as it means each tooth of the blade will slowly go through the wood, giving you greater control.
Step 15: Use a Faster Speed for Softwood
However, a slow speed is not going to work for every type of wood. If you are using a softwood, such as a maple, as an example, then a faster speed will be best to get a better outcome. That is because of how the blade will go through the softwood. A slow speed can damage the wood and not give you a smooth finish.
Step 16: Guide Using Both Hands
You want to put your wood on the table and then use both hands to guide the piece through the saw. Once again, this provides you with a greater sense of control with the tool, and it does mean the blades will be unable to simply rip the material out of your hand and make a mess of things.
Also, never rush the wood at any point. It makes a jagged edge when you seek to push the material through the blades.
Well, I got my shop area cleared out! My scroll saw and drill press work great! I will be working on some samples of ideas and posting later. So stay tuned and let me know what you guys think!
— Emmie (@emmie62995) June 3, 2021
Step 17: How to Make a Right Angle
If you need to make a right angle, then stop the cutting and remove the material from the saw. You then need to reposition it to make the correct cut, as this is the easiest way to follow the line. Keep in mind that the blades must always be facing the direction you want to cut, so you need to reposition when creating this angle.
Step 18: Turn off and Remove When Finished Cutting
When you have finished cutting, you need to remember to turn off the machine and then remove the blades that have been used. It is for purely safety reasons.
Once you have completed this part, check your work to see if you are happy with the result.
Additional Tips
As you can see, using a scroll saw is relatively easy, but several steps need to be followed to get the best woodworking results. However, we also have a series of tips that are worth checking out, and they will also make life a whole lot easier.
Be Aware Of a Stack
Some people will stack wood together to get a number of cuts at the same time. If you do this, then make sure everything is pinned together so that none of the parts moves.
However, you then need to increase the size of the blades you are using since all of those pieces will add up when it comes to their overall thickness.
Keep the Blades Square
Another huge tip is to make sure that the blades always remain square to the table. It allows the teeth to cut the wood at the right angle, which means you have greater control over the end result.
Use Tape
Applying tape to the blank will mean you reduce the chances of it burning, which means the piece you are working on will not then be damaged. The tape also helps mark off the areas left alone, so sawing becomes substantially easier when you have these types of guides to help you out.
It’s time for the NBA Playoffs! I’m stoked to see my team make the cut (see what I did there). Here’s an Atlanta Hawks logo, fresh off the scroll saw! #truetoatlanta pic.twitter.com/rag56sqPdI
— Shawn Cartwright (@SportsFanShawn) May 22, 2021
Light the Area
If you do not have a scroll saw with a light attached to the tool itself, get a light source and have it nearby. You must have light to watch what is going on with the cutting aspect, as it means you will find it easier to stick to your lines.
Use Scrap Wood to Hold Things Together
If you are working on an intricate piece that is difficult to hold, then using scrap wood can come to your rescue. Build a case around the wood, and then hold onto the scraps to give you that guidance when cutting.
Have Various Blades
The final one of our tips is on the number of blades you should own. Always remember that the saw itself can take various sizes of blades depending on what you will be cutting, so you need to own several sizes to provide you with those options.
The size will correlate to the size of the teeth, and it does make a difference when you go to stack wood, just as we said earlier.
It should make sawing a whole lot easier as you can focus on the wood rather than the tool itself.
Start Your DIY Project
There is no doubt that a scroll saw will be a wonderful tool for any individual who is looking at cutting out some intricate shapes. Please do take your time in trying to perfect your technique and method, as the results can be outstanding.
Finally, get a variety of blades to use depending on the wood and the thickness. It will speed up the entire process, and you will be glad that you had these options.
Paul is the type of person who never met a problem he couldn’t fix. He can always be found tinkering with something in his house, even if it isn’t broken! His tips and tricks are often shared on our site. He’s the one you call when something breaks because he has been known to improvise fixes for everything from leaky faucets to malfunctioning dryers.