Last Updated on
If you want to strip paint, learn the steps of bending plastic pipes, shrink wrap and more, you’re in the right place because, in today’s article, we’ll be explaining to you how to use a heat gun and sharing our top safety tips for efficient use.
How a Heat Gun Works
Heat guns work by extracting air into the tool’s body and driving this through an internal electric heating element and back out through the nozzle.
A heat gun functions similarly to a hairdryer because the fan pulls air into the tool’s body. You can also operate these tools using one hand, but this may depend on the model you have and the project you are working on. On some guns, you have the choice between a variety of heat settings and fan speeds. However, some may only have just one heat setting and one fan speed. If you need to adjust the temperature on your heat gun, you can hold it away from the surface for a second to adjust the fan speed and hot airflow.
How to Use a Heat Gun
Here are some tips on how to use a heat gun for the best results.
For Killing Weeds
Exposing weeds to a high temperature kills them quickly and efficiently, without you having to worry about applying too much chemical weed killer and affecting any surrounding plants.
Below is a step-by-step guide on how to kill weeds in your garden using a heat gun.
Step 1: Connect the Heat Gun to an Electrical Outlet
Ensure your tool is switched off before you plug it into an electrical outlet. Then, switch on the heat gun and set the temperature to around 82°C. However, you may want a higher temperature depending on the severity of the weeds in your garden (with a larger surface area requiring a higher temperature).
Step 2: Position the Nozzle
Point the gun’s nozzle at the weeds, ensuring that the heat directs to the centre of the weed. Hold the tool in this position until the weed begins to wilt. Then, move on to the next patch of weeds, killing each one individually by directing the gun’s heat at the weed’s centre.
It’s important to note that you should never place the gun’s nozzle directly onto the weeds, as this could cause your tool to overheat. Instead, maintain a healthy distance from the weed. Once the weed begins to wilt, you’ll know that your heat gun has done its job, and you can move on to the next weed plant.
For Removing Varnish
You can also use a heat gun to remove varnish. For this process, we have listed an appropriate method and some tips below.
Step 1: Wash the Surface
Start this process by cleaning the varnished surface using warm, soapy water. Dip a microfibre cloth into this solution and, using a circular motion, remove any visible dirt and dust particles from the area.
Strip club! 😀
— Phil Stevens (@philwithadrill) July 4, 2021
The mounts for the flamethrower are 20mm wide strips of thin ABS, wrapped around the same diameter tube and heated with a heat gun, to retain the shape.
After a bit of bending and heating, they were fitted to their wood mounts.#blakes7 pic.twitter.com/v8QHqYrnER
Step 2: Soften the Varnish
Once you’re happy that the varnished area is clean, it’s time to soften the varnish using your heat gun. Start on a low-temperature setting as, if need be, you can always increase the intensity as you continue.
Use the heat gun on one area at a time until the varnish begins to soften. Then, use a paint scraper to remove any varnish from the area. If you’re unable to remove the varnish using a paint scraper, apply the heat gun on a higher setting and have another go at it. Depending on the number of layers of varnish, you might need to repeat this process several times.
Step 3: Wipe the Area
When you’re happy that you’ve removed all of the varnishes from the surface, it’s time to rewash the area using warm, soapy water, as we did in step one.
Give yourself a good time frame to remove all of the varnishes, as the process can be long and requires patience and precision. We recommend completing these steps in one day rather than over several days.
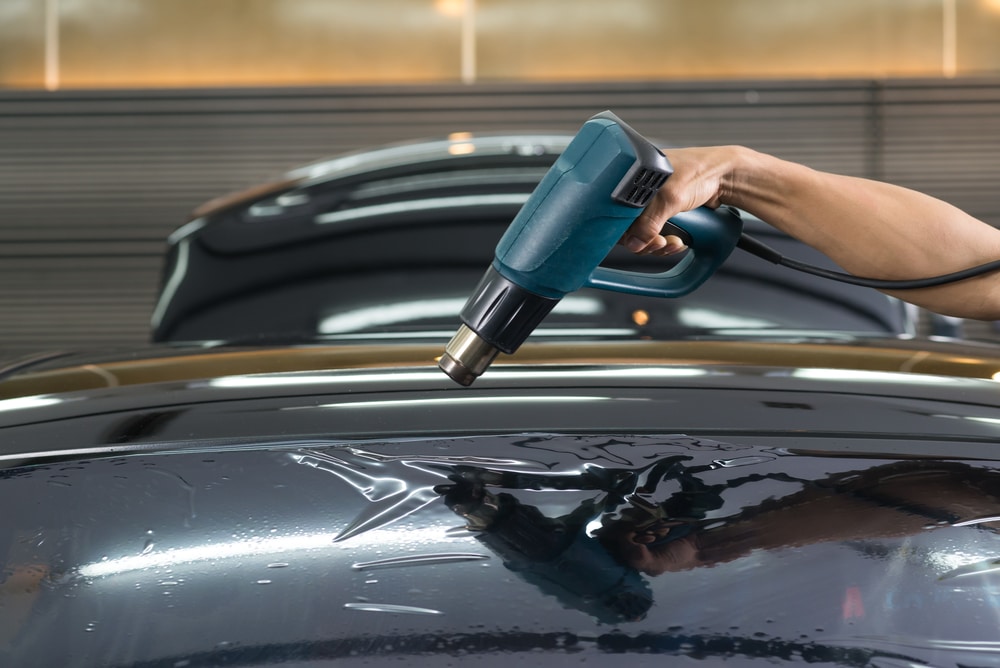
Positioning the Heat Gun in the Right Way
Place your heat gun a couple of inches away from the surface you want to heat. As mentioned above, positioning the tool too close to an object can cause the gun area to overheat. You’ll notice a texture change on the heated. So that the surface doesn’t start burning, keep the heat gun moving. It ensures that no surface will catch fire while also providing you with an even, professional result.
Place a Cloth Underneath the Object
If you’re removing varnish or anything from a small area, you may want to bear in mind that you could damage the surface below the object you’re heating. Therefore, placing a heatproof cloth underneath will protect such surfaces.
Safety Advice
Stay safe when operating a heat gun with these tips.
#3dprinting tip – use a heat gun to get rid of those pesky strings pic.twitter.com/xoyi5c8GJC
— Barb (@barb_3dprintny) October 15, 2020
Move It Around During Use
Heat guns can reach a high temperature, so you must use these tools safely and responsibly. As such, we suggest always holding this power tool at a 45-degree angle and ensuring that you move it around often to avoid applying too much heat on one section for too long. If you’re using it for stripping paint and notice that the paint is beginning to bubble, make sure to move the power tool to another area. Keeping the heat gun on a section of paint for too long can warm up the area and result in leaving burn marks on your walls.
Allow It to Cool
After you’ve finished using your heat gun, give the tool ample time to cool before you place it back into storage. We also recommend placing your tool on heatproof material to avoid any accidents or burn marks on your furniture or floors.
Wear Gloves and Googles
We recommend wearing gloves using your heat gun to protect your hands from heated air that may reflect off the surface you’re working on, as well as from the gun itself. Using a device that reaches such high heat levels may lead to serious burns.
Used my new heat gun to strip a door today. Def use a respirator with a gas particle filter if you try this yourself. Did a great job lifting paint from carved detail. Pretty good job but I'll still need a chemical remover to get down to clean wood. pic.twitter.com/JXS4gohg0z
— Seattlegirl Reno (@SGDesign206) July 4, 2021
Tie Back Long Hair
If your hair is long, it’s best that you tie back your locks and maybe even wear a hat to prevent any loose strands from getting set on fire by the heat gun accidentally.
Don’t Wear Loose Clothing
The chances of your clothes burning from a heat gun are very slight, but why take the chance? That’s why we suggest wearing tight clothing while using this tool or ensuring that you tuck in loose shirts and roll up long sleeves to prevent the heated air or a naked flame from setting you or any flammable materials on fire.
Ventilate the Area
Ideally, you will use your heat gun outdoors, but if that’s not possible, open a window or turn on an extractor to keep the area well-ventilated. Doing this will help prevent you and others from inhaling toxic fumes. You may even wish to wear a mask to protect your lungs from inhaling any toxicity.
#LifeHack use a nice heat gun to remove old hard caulk.#diy pic.twitter.com/pZlYccZ9MX
— JTX-REI (@JtxRei) July 3, 2021
Use a Surface Stand
Many heat guns are available with a surface stand that allows you to securely place the tool onto a surface while it’s still hot. A surface stand gives you the opportunity for a brief break, keeping your hands free to do any other tasks.
Focus On the Job
You can follow all of the above safety tips, but if your mind isn’t focused on the task in front of you, an accident is more likely to happen. So keep your attention and eyes on what’s happening in front of you until the heat gun stops. Direct heat can damage and burn your skin, so never take risks.
The Right Temperature Setting for Your Task
I’ve been told by the car dealership to stop scraping my tires with a heat gun after everytime I drive, I guess they just don’t want me reaching optimum lap time???
— Jawn Cherry (@jawnny_carson) July 2, 2021
Because some heat guns come with a range of temperature settings, you must know which setting is best for the task that you’re working on.
- For drying paint, stick to 30—130°C
- Opt for 100–200°C for drying damp wood
- For softening adhesive materials, choose 300–400°C
- To bend plastic pipes, choose between 200 and 300°C
- Weld plastics between 330 and 400°C
- Fully activate adhesives to remove old stickers from a surface using a temperature of at least 220°C
When to Use and Not Use a Heat Gun
If the paint was issued before 1980, it is most likely will be lead-based paint. It is therefore not recommended to use your heat gun for paint stripping. This is because heating a painted surface could release toxic fumes, making your environment unhealthy and potentially dangerous to breathe in. Instead, we recommend consulting a professional to remove paint in these circumstances.
Ok going to the store to buy a heat gun
— Dadneto ✡️🏳️⚧️ (@Magnetotistic) July 4, 2021
Furthermore, don’t use a heated gun to remove loosened paint from plaster walls since the high temperature of the tool can damage the underlying surface.
Alternatively, there are several surfaces on which you can safely use a heat gun to remove paint. These include bare wood, brick, metal and stone. Where possible, perform this task outside, or while wearing a face mask, as heating any surface may release fumes that could be dangerous for you to inhale. If you can’t perform this task outside, ensure that you properly ventilate your environment.
When removing paint from concrete, opt for lower air flows to prevent damaging the material. You should also bear in mind that a heat gun can’t remove stains from paints.
Different Accessories of a Hot Air Gun
Most heat guns come with various attachments and nozzles that make your tasks easier to complete and provide excellent precision for your household projects.
Today is a good day for making! Already had my first completely successful resin print and now I have both printers going. Plus, new heat gun 😁 #3Dprinting pic.twitter.com/9YmUb2ZHfO
— James Ⓥ jamesoncrumpet.bsky (@James___UK) July 4, 2021
Scraper
Scrapers on a heat gun are designed to remove paint from wood or other surfaces.
Cone Nozzle
A heat gun nozzle focuses on taking measurements of heat temperatures against various substances.
Spoon Reflector
This heat gun attachment is excellent for defrosting frozen surfaces, bending metals and welding materials that aren’t joined.
Surface Nozzle
Finally, a surface nozzle is excellent for welding when you’re trying to achieve a particular temperature against a larger surface area.
Do You Have Experience With Using Heat Guns?
Above all, your safety is the most important thing when using heat guns, so keep your hair tied back, wear protective clothing and goggles, and move the heat gun when working on a small surface to help prevent any heat damage. If you have any additional operation tips or heat gun uses to share, we would have happy to hear from you in the comments below.
Amy is a U.K.-based writer and editor with a penchant for helping consumers find the best home products for their needs, as well as providing easily digestible guides for living better at home. Her dedication to her work means she can usually be found elbow-deep in research or hunting down samples of the latest and greatest on behalf of her readers.
An avid DIYer herself, Amy’s passion lies in teaching others how they too can achieve their dream homes by tackling some of those pesky projects themselves! Whether it’s building furniture from scratch or turning an old dresser into a coffee table, Amy is always happy to share what she knows about making your house feel like home without spending a fortune.