Last Updated on
Baking bread at home requires a significant amount of time and effort if you do it by hand. However, bread makers allow you to make freshly baked bread with little more than a touch of a button. Instead of mixing, kneading and shaping the loaves by hand, you can add the ingredients to the machine and wait while it does almost all of the work.
Although bread makers are simple to use, each one is unique, so it’s typical to need some advice when looking for the ideal appliance. This article will teach you how to use a bread maker and other helpful tips so you can eat a delicious loaf of fresh-baked bread whenever you want.
Getting Started
Here are some important pieces of information you need to know before using a bread maker.
How Does a Bread Maker Work?
Bread makers allow you to make bread in one convenient countertop appliance. White bread, whole wheat bread, and any other soft bread for sandwiches can all be made in a bread machine. Additionally, some machines offer unique settings for different kinds of bread.
A bread machine does all of the bread-making work for you. It combines the ingredients, kneads the dough using an internal paddle, uses a heating element to help the dough rise, and bakes it. Depending on the specific recipe, a bread maker may also run through another knead and rise cycle. So, all you will have to do is add the ingredients, press start, let the machine do its thing, and wait for your freshly baked goods to be ready.
What Order Do You Put Ingredients in a Bread Machine?
The order you should add ingredients to a bread maker varies from one machine to the next. Typically, bread machines recommend adding the dry ingredients first, the wet ingredients second, and the yeast last. However, it is important to read your owner’s manual first to find out what works best for your specific machine.
Step-by-Step Guide to Using Your Bread Maker
How to use a bread maker is quite easy. Just follow the steps below if it is your first time or if you want to make sure you are doing everything correctly.
Step 1: Read Your Bread Maker’s Instructions
- If you want to use a bread machine, the first thing you need to do is read the user manual. Every bread machine is different, so you must pay attention to your machine’s instructions.
- Some bread makers recommend premixing dry ingredients, some direct you to add the dry ingredients first, and some direct you to add wet ingredients first. Considering how precise making bread is, you won’t want to mix this step up.
- The instructions for your bread machine will also provide you with key information relating to the settings. For example, the time needed to complete a bread cycle and the types of dough your machine can make.
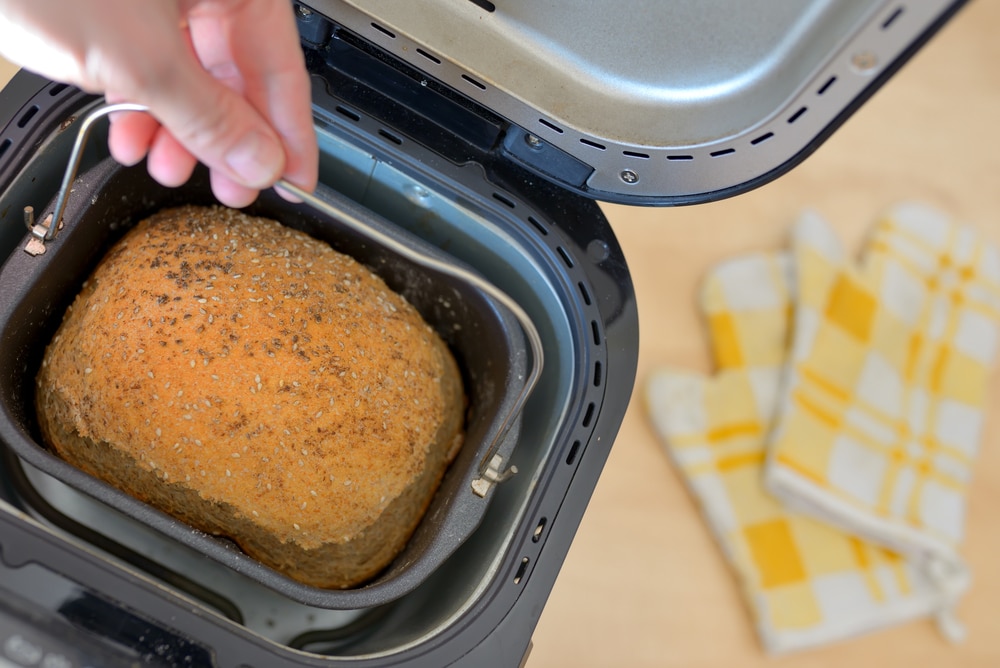
- The machine’s instructions will also tell you about the bread pan capacity and how much bread it can make at one time. Most bread makers can make either a 1, 1.5 or 2-pound loaf.
Step 2: Different Bread Machine Cycles
The dough is coming along nicely, from chunky to smooth. The bread machine has cycles like a washing machine.
— Liewe Heksie (@LaviniaEngel) October 11, 2020
It was cold while mixing. Now it's very slightly warm, which should mean the dough is rising. I won't open it again until the bread is ready.#breadmachine #baking pic.twitter.com/YSNt4nl1xH
- Different cycles on your bread machine will allow you to make various types of loaves. Each cycle has different lengths of time for each step of the process. We recommend starting with the basic cycle on your bread maker until you feel comfortable making bread.
- Most bread makers also allow you to choose between a light, medium golden brown, or dark crust setting.
- Many machines also feature a dough setting that allows you to mould and bake the bread yourself but does all of the mixing and proofing work for you. This cycle is great for making pizza dough, rolls, pretzels, or even making jam.
- Other common cycle settings include a delayed cycle and a bread cycle for loaves of bread that do not require yeast, like banana bread or cornbread. When using the delayed cycle, it is recommended not to use milk unless it is dry milk or powdered buttermilk.
Step 3: Choosing Your Ingredients
- A basic bread recipe calls for only four or five ingredients: water or milk, yeast, flour, salt for flavour, and possibly sugar to help the yeast rise and add a hint of sweetness.
- You can also try adding a touch of oil to help make sure the bread doesn’t stick to the sides of the interior pan and the bread paddle. Depending on your bread machine, the interior paddle that mixes the ingredients could tend to stick to the dough but adding a teaspoon of oil should help prevent this from happening.
- To get the best possible results, always use fresh ingredients when making bread in a bread machine. Fresher ingredients will make better-tasting bread and will also ensure the baking process goes smoothly.
- The liquid ingredients you add to your bread recipe need to be at the proper temperature for the yeast to activate properly. If the water or milk is too hot, it may kill the yeast and if it is too cold, the yeast may not activate. Either way, if the water or milk is the wrong temperature, your bread dough will not rise. Ideally, the liquid you use will be around 26.6 degrees Celsius.
- As we mentioned, fresh milk is typically best, but powdered milk or powdered buttermilk can easily be substituted and often is with bread machine recipes. If you use powdered milk, you can add it straight to the bread pan and allow it to mix with the rest of the ingredients.
- When it comes to flour, you have a couple of options. However, bread flour is typically thought of as the best option because it has higher protein levels and produces more gluten when kneaded, especially when compared to regular flour or all-purpose flour. In addition, bread flour made from hard wheat has more gluten, giving the bread more elasticity and producing better bread for bread makers. It can be found in your regular baking aisle in the supermarket. If you decide to use something other than bread flour, like all-purpose flour or whole wheat flour, you can add one teaspoon of wheat gluten as a substitute. Just make sure to account for this addition when measuring the dry ingredients.
- Like the milk or water, if your bread recipe calls for eggs, they will also need to be at room temperature to create the right environment for the yeast to activate and grow. If your eggs are cold and you don’t have time to leave them on the counter for a couple of hours, you can soak the whole egg in a glass filled with warm water for a few minutes to help bring them to room temperature.
- If your bread recipe includes cold butter, make sure to cut it into small cubes so it mixes in the dough evenly.
Step 4: Working With Yeast
- Yeast is a somewhat temperamental ingredient. It needs a warm environment to grow; however, it can’t be too hot, or the yeast will die. On the other hand, it also can’t be too cold as it otherwise will not activate properly. This is why the temperature of the other ingredients is so vital to your bread-making success. Yeast needs to be between 35 degrees Celsius and 46 degrees Celsius to activate and grow.
- Bread machines function best when you use rapid-rise yeast or bread machine yeast. As the name suggests, bread machine yeast is specifically designed for use with a bread maker. Rapid-rise yeast does not require proofing, and it allows you to add it to the machine with the other ingredients.
- Active dry yeast can also be used in bread machines, but it requires additional prep work. If you use active dry yeast, you will have to check to make sure it is still working. You can do this by mixing some with lukewarm water to see if it bubbles. To add it to the bread machine, you will need to dissolve it in water before adding it to your bread machine. This means you may also need to adjust the recipe proportions slightly to maintain the correct ratio of dry to wet ingredients.
- Keep in mind that yeast activates when it comes in contact with any moisture, even the moisture found in cheese. This is why yeast is typically added to a bread machine after all of the other ingredients.
Step 5: Be Exact With Your Measurements
- If you want to make good bread, you must be exact when measuring the ingredients. Your bread could fail to rise if your measurements are off, and you could wind up with a chewy, dense loaf. If your liquid measurements are off by as little as a teaspoon, it could seriously affect the recipe.
- If you add too much liquid, your bread could collapse or fail to rise completely. On the other hand, if you don’t use enough liquid, your bread will be tougher than expected and harden during the baking process.
- It is also important you don’t overfill the specific machine’s capacity. Bread machines can easily overflow and cause a hot sticky mess if you are not careful. Even if the interior pan does not look full, a considerable amount of space is needed to rise and expand while baking.
- Flour is easily packed down and often becomes dense in its bag, making it easy to measure more flour than intended. Instead of dipping measuring cups into a bag of flour, we recommend you take the time to dump the flour from the bag, whisk it slightly, and then spoon it into a measuring cup. It would help if you also used a flat tool like a knife to level the flour off the top of your measuring cup.
- If your dough is not rising, you could be using too much salt, or your yeast could be expired. Check the expiration date on your yeast and make sure to measure the salt more precisely to troubleshoot this problem.
- Too much chlorine in your water could also kill the yeast. If your tap water has a lot of chlorine in it, you can try using filtered water to help keep the yeast alive and growing.
- If your bread is too dense, try adding a bit more yeast to your recipe to help make it softer and fluffier. You can also try using a different type of flour to change the overall consistency of your loaf.
Bread Machine FAQs and Pro Tips
Here are some answers to frequently asked questions about bread machines, as well as pro tips to help you make the most of your bread maker.
Can You Convert a Manual Bread Recipe for a Bread Machine?
As long as you pay close attention to the liquid ratio to dry ingredients, you can easily adapt a regular bread recipe for use in a machine. Many homemade bread recipes make two loaves at a time, so you may want to start by dividing it in half. You can also compare it to a bread machine recipe that works for you and adjust the wet and dry ingredients while keeping the same proportions.
Can You Experiment With Ingredients?
After you feel comfortable making a basic bread recipe with your machine, feel free to start playing with new ingredients. Many bread machine recipes call for alternate flours like gluten-free bread flour with xanthan gum, rye flour or whole wheat flour. You can also experiment with adding ingredients like olives, garlic, dried fruit, nuts, herbs, spices and cheese.
Can You Make Any Bread in a Machine?
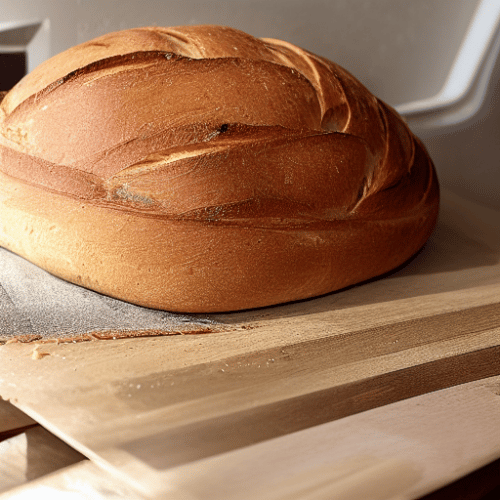
Bread machines are not the best for loaves of bread with an extra crispy crust, such as a rustic style loaf or sourdough. While they make various delicious soft bread, they do not get as hot as your oven to achieve a crispier crust. Of course, different settings may be better equipped for this, but it depends on your specific bread maker’s design.
Bread Makers Made Easy
After reading through our article, baking bread in your bread machine should seem easier than ever. Just remember that baking bread is a precise science, and it may take a few tries to get it right. Just remember to pay close attention to the temperature and freshness of your ingredients and measure them with precision. Soon you will be baking bread like a pro in your kitchen.
Do you have any recipe recommendations or any pro tips for your bread machine? Let us know what you think in the comments below.
Emily is a woman of many talents. She has a B.A. in English and enjoys writing. Emily loves accessorising her home with quality products that not only serve a purpose but also enhance the overall convenience and tranquillity of her living space; there’s nothing like coming home to your own personal sanctuary after a long day! She loves anything that can make life easier or more comfortable—from dishware to furniture to lighting fixtures.