Last Updated on
If you’re doing a home or office make-over, painting a radiator can make it look more appealing, especially if it blends with the background. However, there is a technique around it. If you don’t do it right, you’ll end up with air bubbles and all sorts of irregularities after you’re done. Due to this, you have to be quite keen while painting your radiators.
In this article, we’ll be discussing how to paint a radiator for the best results. Let’s get down to it.
Radiator Painting Guide- How to Paint a Radiator
Step 1: Turn off the Radiator
Don't tell my mum but I'm painting my radiator BLUE!
— DomesticPloddess.bsky.social (@DomesticPlodess) July 16, 2020
First, turn off the radiator and let it sit for at least 30 to 60 minutes. If you apply paint to a hot radiator, the paint won’t adhere to the surface, and you will have a dripping problem.
Step 2: Prepare the Area
To avoid dealing with splashed radiator paint all over the place, you should secure dust sheets on the floor using masking tape. Don’t forget to cover the wall around the radiator using painter’s tape. If you want to go the extra mile, you can put a piece of poster board or cardboard right behind the radiator. Spray painting can stain your furniture and skirting boards.
Open the windows and doors to get a well-ventilated room.
Step 3: Clean the Radiator
Today in the life of Gemmas home DIY I am spray painting my radiator cover black in the garden 🤣
— Gemma Louise (@bygemmaellis) May 8, 2020
Next, clean your radiator with a sponge or damp cloth that has been soaked in warm water mixed with mild detergent. If the dirt or grime is too much, you can scrub the radiator surface with a brush. If you notice any rust spots on the radiator surface, you can scrub them off using a stiff wire brush that has been soaked in white vinegar.
After you’re done cleaning the radiator, rinse the surface using a wet sponge and wipe it down with a dry cloth.
Step 4: Sand the Radiator
If you’re painting a rusty radiator, sanding is essential to get rid of any rust spots, but it’s mostly done to improve the adhesion of the paint to the surface. Sanding the radiator removes all the rough spots and gives you a smooth surface with no debris.
To get the best results, you should clear the radiator overcoat with 40 to 60 grit sandpaper and finish it with 80 to 120 grit sandpaper for a smoother finish. However, make sure that you wear a paint respirator mask, goggles, and gloves, so you don’t get exposed to harmful chemical residue when you sand the radiator.
Please note that most radiators manufactured before 1978 contain lead paint, and the particles can be fatal when inhaled or ingested. Even if the radiator you have right now contains no lead particles, you should always wear full safety gear while painting radiators.
Step 5: Wipe Off the Dust
After you’re done sanding the radiator, you can use a vacuum cleaner to remove the dust residue. Additionally, you should wipe the surface with a damp cloth to get rid of any dust and debris particles that you could have missed. Next, you should let the radiator air dry for a few minutes.
Step 6: Choose the Right Primer and Paint
If you didn’t know, you can’t use normal house paint and primer on a radiator. This is because a radiator operates at a high temperature, and it accumulates a lot of dust and grime. That means, if you don’t pick good-quality paints, the paints will crack and fade quickly. Not to mention, normal paints might not adhere to the radiator properly.
To get the best results in this project, you should choose a paint that is oil or water-based and intended for metal surfaces. Similarly, you should choose an oil-based primer for metal surfaces. Other than that, both the primer and paint should be rust-resistant and capable of withstanding high temperatures.
Otherwise, you should pick a colour that suits your preference. We recommend a colour that blends with the surroundings. If you want the radiator to look unique, pick a different colour from the room background.
Step 7: Apply a Specialist Radiator Primer/Metal Primer
Before you apply the paint, you first need to use a metal primer on the radiator. It is essential if you want to improve paint adhesion and durability. The primer will also protect the surface against rust and corrosion.
Remember, you should wear a protective respiratory mask, goggles, gloves, and an apron before you start. If you’re using an aerosol anti-corrosive primer, you should stand at least 8 to 16 inches away from the radiator and spray it. While applying it, make sure that you spray the primer evenly with an up and down motion over the visible surface of the radiator.
However, if you’re using a paintbrush to apply the primer, we recommend an angled radiator brush with a long reach. Whatever method you use to apply the primer, make sure that it completely dries up before proceeding to the next step.
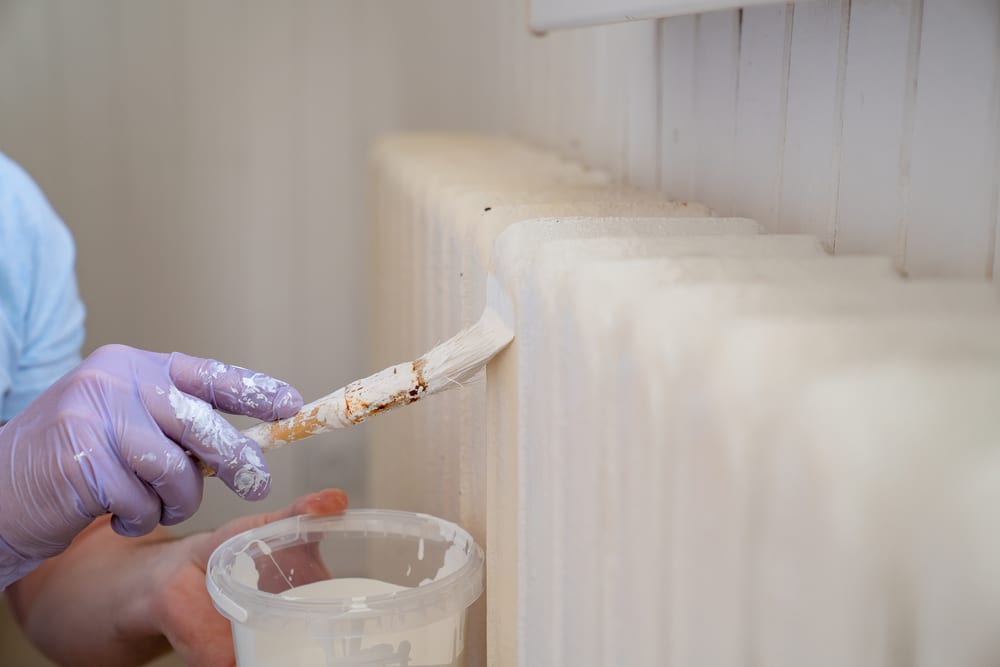
Step 8: Paint the Radiator With Heat Resistant Paint
Finally, it’s time to paint the radiator, but you need to follow almost the same technique that you used to apply the primer. If you’re using aerosol spray paint, make sure you shake the spray paint can and spray the paint evenly over the radiator’s surface with an up and down motion.
But if you’re using tinned paint, you should first shake the tin vigorously for about 2 minutes, and once you’ve opened it, you should stir the paint with a stick; this is done to give the paint’s colour consistency. Take a brush and dip the bristle in the paint but don’t overload it.
As for the painting approach, you can start on the edges as you move towards the face of the radiator. However, make sure that you move the brush in the same direction; it should move from top to bottom with long and sweeping strokes.

After you’ve finished painting the first coat, you should let it sit for a few minutes (or as recommended on the product’s label) before you apply another coat of paint. Adding an extra coat onto the first coat improves the colour depth.
After you’re done painting, wait for the final coat of paint to dry before you turn on the radiator. The paint on the radiator might take 24 hours to dry, so be sure to check.
Painting a Radiator FAQs
Do I Need to Remove My Radiator From the Wall so I Can Paint It?
It’s not necessary to remove the radiator from the wall to paint it. You don’t want to risk damaging it. Not to mention, if you use a specially angled radiator brush, it’s possible to paint the back of the radiator without removing it.
Can I Paint My Radiator Pipes?
Definitely! You can paint your radiator pipes using the same procedures we’ve discussed in this article.
Start Painting
Now that you know how to paint a radiator, it shouldn’t be much of a hassle for you. While painting a radiator might seem hard, you just have to follow the steps listed here. However, it’s important that you follow all the steps we’ve discussed in this article, and don’t forget to wear the necessary protective gear considering paint fumes can be toxic.
Have you ever painted your radiator? Do you have any tips to share? Let us know in the comments section below.
Ian loves everything that revolves around the home improvement niche. He loves trying out new home appliances. He has also handled a lot of equipment and has a lot of insight. Plus, he’s worked on various home improvement projects that became a success.
If Ian isn’t busy working on his latest project, you can find him reading up about another one!