Last Updated on
Whether your cooker hood is in desperate need of a deep clean, or you’ve just invested in installing a brand new cooker hood that you want to keep in top condition, follow our step-by-step cooker hood cleaning guide to make sure you get it right. Despite its great level of durability, stainless steel is easily damaged when cleaning; thus, it’s crucial to follow the right procedures. Plus, regularly cleaning your cooker hob will keep your kitchen smelling good and ensure maximum airflow.
Cleaning Your Stainless Steel Cooker: An Easy Guide
Follow this guide if you need help cleaning a stainless steel cooker, and you should be ready to go!
Step 1: Cleaning the Filters
Washing or replacing your cooker hood filters is essential to keeping your hood in good working order and odour-free. Accumulated grease will block airflow and impede performance, while a large build-up of fat could become a fire hazard. While some types of grease filters can be washed, others need replacements. Another important piece of info to add is that cleaning your cooker hood can become easier if installed properly.
- Metal filters – reusable and washable
- Fabric or paper filters – replace your paper filter when saturated.
- Carbon filters – replace every 3-6 months. Some can be washed following the manufacturer’s instructions.
If your extractor hood has metal filters, you will need to do the following items for this step:
- Degreaser
- Hot soapy water
- Kitchen roll/cloth for drying
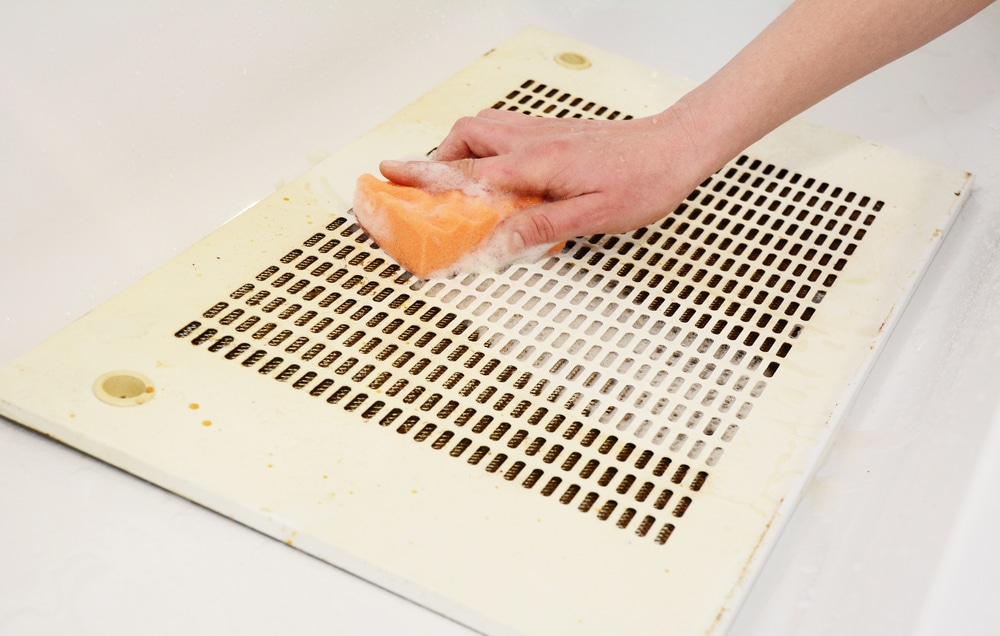
Remove your filter from your cooker hood and spray on the degreaser. You may want to place it over your sink to this to prevent your worktop from getting covered in grease and grime.
Leave the degreaser to break down the residue for approximately 10 minutes, as recommended in the accompanying usage instructions. Once it’s done, rinse out your metal filter with hot water to remove all the grease. If your metal filter is dishwasher-safe, you can also run it through your dishwasher for an extra clean finish.
Note that aluminium cooker hood filters are not recommended for cleaning inside a dishwasher, so double-check if you have any doubts.
Once your metal filter is sparkling clean and free from greasy residue, please give it a good dry with some paper towels or lint-free cloth, and then let it air dry. Don’t apply heat to your filter, as this could affect its integrity. With your metal hood filter clean and ready to go, or your replacement lined up, it’s time to move on to step 2 before replacing it inside your hood.
Step 2: Cleaning Inside the Cooker Hood
There is little point in replacing your filter with a nice clean one if you don’t take the time to remove the built-up grease from inside your cooker hood. If you regularly clean your extractor or it’s a brand new model that you’ve only had for a short period, this step can be just a simple wipe-over with a damp cloth or kitchen roll.
In most cases, though, you’ll want to take your degreaser and spray it on to make wiping off grease extra easy. For large grease accumulations, leave your degreaser for 10 minutes so that it can get to work. In this case, we recommend placing a kitchen roll, a newspaper, or old clothes under your hood to catch the drips.
You’ll also want to take care that no grease or cleaning products enter the motor. If you struggle to get into the corners, use a soft toothbrush to scrub hard-to-reach spots in the interior gently.
Don’t have any degreaser to hand? You can also try mixing the bicarbonate of soda in boiling water. Allow it to cool so it’s hot but not too hot to handle. Use a sponge or a micro-fibre cloth to apply the solution, taking care to avoid getting the motor wet. You may need a little more elbow grease than a chemical product for degreasing.
However, unless your hood is in desperate need of a deep clean, you should still get great results with a little hard work.
Before moving on to cleaning your hob exterior, make sure that you have rinsed off all traces of cleaner and wiped your hood interior dry with kitchen paper or a soft cloth.
Step 3: Cleaning the Exterior
While your extractor hood surface is not likely to be as grease-laden as the interior, it can still get pretty sticky with a film of grease, food stains and fingerprints. Therefore, you’ll have to ensure that your cleaning methods are not over-aggressive when cleaning your cooker hood exterior. Otherwise, you’ll risk damaging the surface of your hob, which will detract from its looks.
Either use a special stainless steel cleaner or make up a paste from one part bicarbonate of soda to one part white vinegar to gently wash your cooker hood. You can use a spray or apply it with a soft sponge. Before you start cleaning, take a few moments to closely inspect your hood to work out the direction of the metal “grain”.
Looking closely at the metal, you should be able to see miniature grooves in the metal. Therefore, when cleaning the exterior, you will want to clean in a linear motion along the grain, not in circles. Cleaning in this manner will allow you to effectively remove grime and grease build-up inside these tiny crevices, as well as improve your appliance’s shine.
Bear in mind that the metal on cooker hoods may have different grains, so don’t forget to change direction as you change sides if necessary. While cleaning your stainless steel hood, remove the light cover and leave it soak in hot soapy water. If necessary, remove any stubborn sticky grease with a soft-bristled toothbrush or gentle cleaning pad. Please don’t use anything too abrasive, as it could scratch the surface.
Replace your clean and dried light bulb casing and proceed to buff your hood exterior to a sheen with a soft cloth in the direction of the grain.
Stainless Steel Hood Cleaning Tips
Here are some other cleaning tips that will come in handy once you do the work.
- Do not use a scourer or wire brush to scrub your metal cooker hood – you can damage your hood’s finish.
- Never use bleach or coarse cleaners on stainless steel.
- Don’t forget to rinse cleaning products away thoroughly.
- Use warm water or boiling water if you are using baking soda when cleaning a cooker hood.
- Always follow the direction of the grain for the best results and to avoid losing sheen.
- After cleaning, consider pouring 2-3 drops of olive oil or baby oil onto your polishing cloth and buffing it into your hood in the direction of the grain. This will give you a shiny finish and help prevent streaking, and provide a protective layer. Don’t use more than a few drops, and you’ll risk turning your extractor hood into a sticky mess that will be a real dirt magnet.
How Often Should You Clean Your Cooker Hood?
Perfect timing: Cleaning your range hood just before you get into heavy cooking for the holidays is a smart move. It ensures your house will smell of the right odors when guest come a-knocking. https://t.co/OAQvLmMGPr #kitchendesign pic.twitter.com/NIux3YlTa2
— Fairfax Kitchen Bath (@FairfaxKitchen) November 26, 2019
Unsurprisingly cooker hoods can get pretty dirty in a short amount of time. However, regular cleaning will prevent a build-up of dirt and grease from accumulating, meaning you won’t lose any more effective odour removal performance.
While there are no hard and fast rules about how often you should clean your cooker extractor, you should consider giving it a full clean every month if you use yours daily. In addition, you will probably want to wipe the exterior when cleaning your kitchen surfaces or other stainless steel appliances to keep it looking clean and shiny.
Keep It Clean
Knowing how to clean a stainless steel cooker hood should be an essential part of your routine kitchen cleaning and will help ensure that it works well to keep your kitchen smelling fresh and looking good. The more often you clean your cooker hood, the easier it will be to keep clean and the less time it will take. Follow the steps in our stainless steel cooker hood cleaning guide to ensure that you keep your hood’s finish in prime condition as well as ensure optimum functionality.
Kelly is an expert in consumer product research, which is very important when it comes to finding the most useful and aesthetically pleasing items for your home. This became her passion after finding it very time-consuming to wade through all the product information online.
She has keen attention to detail which she brings to her articles. Kelly’s goal is to help you find what you need without spending too much time searching for it.